The World Wide Web (WWW) is based on technology called hypertext. The Web may be thought of as a very large subset of the Internet, consisting of hypertext and hypermedia documents. A hypertext document is a document that has a reference (or link) to another hypertext document, which may be on the same computer or in a different computer that may be located anywhere in the world. Hypermedia is a similar concept except that it provides links to graphic, sound, and video files in addition to text files.
In order for the Web to work, every client must be able to display every document from any server. This is accomplished by imposing a set of standards known as a protocol to govern the way that data are transmitted across the Web. Thus data travel from client to server and back through a protocol known as the HyperText Transfer Protocol (http). In order to access the documents that are transmitted through this protocol, a special program known as a browser is required, which browses the Web.

Your information source!
Domain Name System
The addressing system on the Internet generates IP addresses, which are usually indicated by numbers such as 128.201.86.290. Since such numbers are difficult to remember, a user-friendly system has been created known as the Domain Name System (DNS). This system provides the mnemonic equivalent of a numeric IP address and further ensures that every site on the Internet has a unique address. For example, an Internet address might appear as crito.uci.edu. If this address is accessed through a Web browser, it is referred to as a URL (Uniform Resource Locator), and the full URL will appear as http://www.crito.uci.edu.
The Domain Name System divides the Internet into a series of component networks called domains that enable e-mail (and other files) to be sent across the entire Internet. Each site attached to the Internet belongs to one of the domains. Universities, for example, belong to the “edu” domain. Other domains are gov (government), com (commercial organizations), mil (military), net (network service providers), and org (nonprofit organizations).
The Domain Name System divides the Internet into a series of component networks called domains that enable e-mail (and other files) to be sent across the entire Internet. Each site attached to the Internet belongs to one of the domains. Universities, for example, belong to the “edu” domain. Other domains are gov (government), com (commercial organizations), mil (military), net (network service providers), and org (nonprofit organizations).
TCP/IP
TCP/IP is a set of protocols developed to allow cooperating computers to share resources across the networks. The TCP/IP establishes the standards and rules by which messages are sent through the networks. The most important traditional TCP/IP services are file transfer, remote login, and mail transfer.
The file transfer protocol (FTP) allows a user on any computer to get files from another computer, or to send files to another computer. Security is handled by requiring the user to specify a user name and password for the other computer.
The network terminal protocol (TELNET) allows a user to log in on any other computer on the network. The user starts a remote session by specifying a computer to connect to. From that time until the end of the session, anything the user types is sent to the other computer.
Mail transfer allows a user to send messages to users on other computers. Originally, only one or two specific computers were used. They would maintain “mail files” on those machines. The computer mail system is simply a way for a user to add a message to another user's mail file.
Other services have also become important: resource sharing, diskless workstations, computer conferencing, transaction processing, security, multimedia access, and directory services.
TCP is responsible for breaking up the message into datagrams, reassembling the datagrams at the other end, resending anything that gets lost, and putting things back in the right order. IP is responsible for routing individual datagrams. The datagrams are individually identified by a unique sequence number to facilitate reassembly in the correct order. The whole process of transmission is done through the use of routers. Routing is the process by which two communication stations find and use the optimum path across any network of any complexity. Routers must support fragmentation, the ability to subdivide received information into smaller units where this is required to match the underlying network technology. Routers operate by recognizing that a particular network number relates to a specific area within the interconnected networks. They keep track of the numbers throughout the entire process.
Internet
The internet is a worldwide system of interconnected computer networks. It connects millions of computers around the world in a nonhierarchical manner unprecedented in the history of communications. The Internet is a product of the convergence of media, computers, and telecommunications. It is not merely a technological development but the product of social and political processes, involving both the academic world and the government. From its origins in a non-industrial, non-corporate environment and in a purely scientific culture, it has quickly spread into the world of commerce.
The Internet is a combination of several media technologies and an electronic version of newspapers, magazines, books, catalogs, bulletin boards, and much more. This versatility gives the Internet its power.
Technological features
The Internet technological success depends on its principal communication tools, the Transmission Control Protocol (TCP) and the Internet Protocol (IP). They are referred to frequently as TCP/IP. A protocol is an agreed-upon set of conventions that defines the rules of communication. TCP breaks down and reassembles packets, whereas IP is responsible for ensuring that the packets are sent to the right destination.
Data travels across the Internet through several levels of networks until it reaches its destination. E-mail messages arrive at the mail server (similar to the local post office) from a remote personal computer connected by a modem, or a node on a local-area network. From the server, the messages pass through a router, a special-purpose computer ensuring that each message is sent to its correct destination. A message may pass through several networks to reach its destination. Each network has its own router that determines how best to move the message closer to its destination, taking into account the traffic on the network. A message passes from one network to the next, until it arrives at the destination network, from where it can be sent to the recipient, who has a mailbox on that network.
Pizza Stone
A pizza stone is a flat stone or piece of ceramic or earthenware used to evenly distribute oven heat to pizzas or other baked goods, more or less mimicking the effects of cooking a pizza in a masonry oven. The thermal mass and porous nature of the stone used also helps absorb moisture, resulting in a crisp crust.
Small pizza stones can be purchased to fit in any conventional cooking oven. High-end ovens sometimes offer optional pizza stones that are specifically designed for each oven model and may include a specialized heating element. A home made "pizza stone" can also be made by distributing one or two layers of unglazed tiles on top of an oven rack.
To prevent cracking of the stone by thermal shock, the pizza stone should be placed on a cold oven and heated over at least 45 minutes, and it should be allowed to cool down slowly inside the oven after switching it off. Because of the possibility of rapid temperature change, pizza stones should not be left in an oven while it is in self-cleaning mode. Another benefit of pre-heating the stone is that the crust will be crisper.
Some cooks recommend sprinkling cornmeal or breadcrumbs on the pizza stone to prevent the crust from sticking.
The porous nature of pizza stones does have a downside -- the stone will absorb just about anything, including soap. Use a clean, dry brush or plain water to clean the stone.
You can cook great pizza on your Pizza Stone. The key to success is to get your pizza stone hot. That means setting your oven to its highest heat -- typically 525F-550F, and heating your pizza stone for at least 45 minutes before you start cooking. More if you want to cook for a long period. Remember that you are essentially "storing" heat in the pizza stone, and that you will be removing heat each time you cook a pizza. The more you cook, the more you remove. Also, it is important to note that even though the air in your oven might be over 500F, it takes time for the stone to fully heat up.
You will need two tools to make, place and remove your pizza: wooden peel to prepare and set your pizzas, and either a metal peel, or a large metal spatula to remove them. If you are going to throw a pizza party, have 3-4 wood peels on hand so that your guests can be making their pizzas all at the same time. As base of a cooked pizza becomes crisp, it is easier to take your pizza out with a metal tool than a wooden one. The handle of your metal peel should be longer than a regular spatula to safely remove your pizzas from the hot oven.
Make your pizza dough balls and tomato sauce, and you are ready to start. Dust your hands with flour, and take a pizza ball. Flip it over so that the soft bottom side faces up, gently shape the ball into a flat disk, and then start pulling, stretching and turning the disk in the air to make the dough thinner and thinner. Keep working in a circle to keep the thickness of the dough consistent, avoiding thick and thin spots. At the point where you cannot get the dough thinner without making a hole, put your pizza on a floured wooden peel, and use your fingertips to work out the thick spots by pushing the dough to the outside. Make your pizzas about as thick as a credit card and about 10" in diameter.
Remember that the more you handle the dough, the tougher it becomes. Don't use a rolling pin, which is hard on the dough and will give you a thin, but tough pizza. Try to shape your dough in the air as much as possible, before you lay it on the counter -- it will enjoy not being over-handled, and will reward you with a pizza that is both crisp and delicate.
Place your shaped pizza base on a flour dusted pizza peel. Using a spoon spread just enough tomato sauce to lightly cover the base. You should be able to see the dough through the sauce. Sprinkle on a handful of chopped Mozzarella, and then pour on olive oil in a circular pattern. Add a little salt and oregano.
Test to make sure your pizza is not stuck on your peel by moving the peel forward and backward using short jerks - it should slide easily around. If it does stick, lift it up on one side using your fingers, and throw a little flour underneath. Slide your peel back and forth, and that should loosen the pizza up.
If your pizzas consistently stick to the peel, use more flour underneath your pizza dough before you start decorating. Also, if you have a group of people assembling pizzas, and one sits for a while before you place it in the oven, take care; there is a large chance it will stick. To place your pizza, push your peel toward your pizza peel, and then stop it short just short of the back edge, allowing the pizza to slide off the peel. Pull the peel backward as the pizza slides forward.
The perfect pizza is bubbling on top with completely melted (and possibly slightly browned) cheese, has a brown outer crust, and a dark brown bottom. The crust is crunchy on the outside and soft and delicate on the inside. Everything is steaming hot. Throw on some fresh chopped basil and cut your pizza into eight pieces with a pizza wheel. Enjoy.
Cell Phones Features
Things You Never Knew Your Cell Phone Could Do
For all the folks with cell phones. This should be printed and kept
in your car, purse, and wallet. Good information to have with you.
The following can be done in times of emergencies. Your mobile phone can actually be a life saver or an emergency tool for survival. Check out the things that you can do with it.
Emergency
The Emergency Number worldwide for Mobile is 112. If you find yourself out of the coverage area of your mobile network and there is an emergency, dial 112 and the mobile will search any existing network to establish the emergency number for you, and interestingly, this number 112 can be dialed even if the keypad is locked. Try it out.
Have you locked your keys in the car?
Does your car have remote keyless entry? This may come in handy someday. Good reason to own a cell phone: If you lock your keys in the car and the spare keys are at home, call someone at home on their cell phone from your cell phone. Hold your cell phone about a foot from your car door and have the person at your home press the unlock button, holding it near the mobile phone on their end. your car will unlock. Saves someone from having to drive your keys to you. Distance is no object. You could be hundreds of miles away, and if you can reach someone who has the other 'remote' for your car, you can unlock the doors (or the trunk).
Editor's Note: It works fine! We tried it out and it unlocked our car over a cell phone!'
Hidden Battery Power
Imagine your cell battery is very low. To activate, press the keys *3370#. Your cell phone will restart with this reserve and the instrument will show a 50% increase in battery. This reserve will get charged when you charge your cell phone next time.
How to disable a STOLEN mobile phone?
To check your Mobile phone's serial number, key in the following digits on your phone: *#06#. A 15-digit code will appear on the screen. This number is unique to your handset. Write it down and keep it somewhere safe. When your phone gets stolen, you can phone your service provider and give them this code. They will then be able to block your handset so even if the thief changes the SIM card, your phone will be totally useless. You probably won't get your phone back, but at least you know that whoever stole it can't use/sell it either. If everybody does this, there would be no point in people stealing mobile phones.
Free Directory Service for Cells
Cell phone companies are charging us $1.00 to $1.75 or more for 411 information calls when they don't have to. Most of us do not carry a telephone directory in our vehicle, which makes this situation even more of a problem. When you need to use the 411 information option, simply dial: (800)FREE411, or (800) 373-3411 without incurring any charge at all. Program this into your cell phone now.
Risotto The Easy Way
This recipe simplifies the process of making risotto. The classic risotto recipe has been modified to eliminate constant stirring.
Ingredients
(Serves 4)
1 cup of Aborio rice
1 small onion finely chpped
1 clove of garlic finely chopped
2 1/2 cups of chicken broth
2 tablespoons of extra virgin olive oil
2 tablespoons of butter
2 tablespoons of grated Parmeggiano Reggiano cheese
Salt and pepper to taste
Method
1. In a sauce pan, heat the olive oil
2. Add the onion and the garlic. Do not brown, just soften.
3. Add the rice and stir for 1 minute to coat the rice with the oil..
4. Add the chicken stock and bring to a boil.
5. Cover and lower the heat to the lowest setting. Simmer for 20 minutes.
6. Add salt and pepper to taste.
7. Stir in the butter and the cheese.
8. Serve with a nice salad and a glass of your favourite wine. Enjoy.
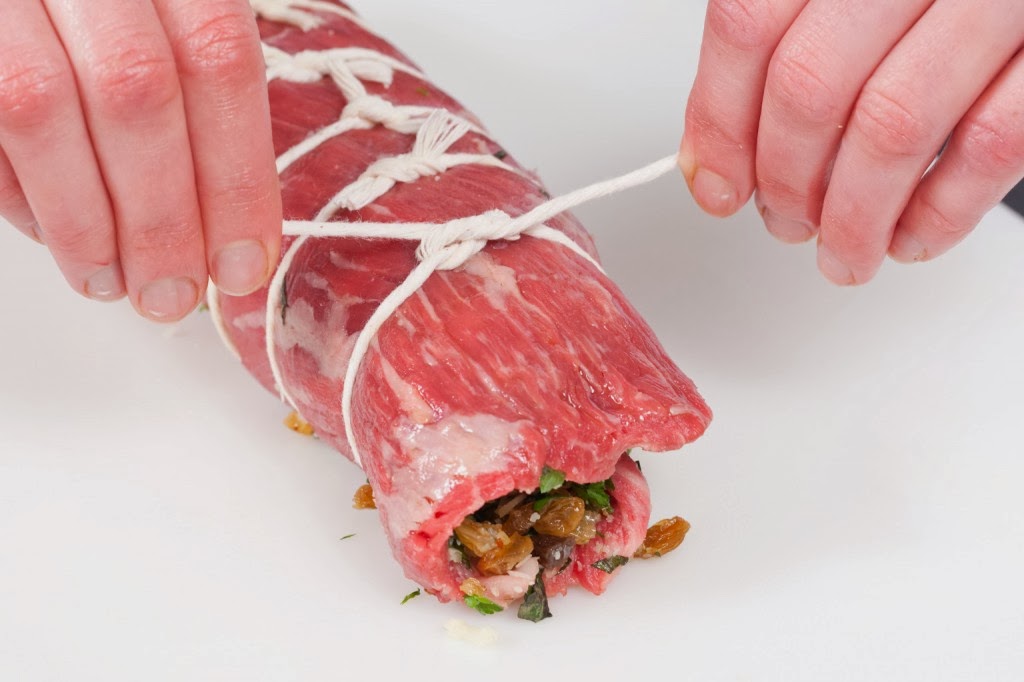
Braciole – Rolled Flank Steak
Incredients
3 cups tomato sauce
1 1/4 cups flavored croutons
1/3 cup grated Parmesan
2 eggs
1 tablespoon chopped fresh parsley
1 tablespoon chopped fresh oregano
1 teaspoon finely chopped rosemary
1 teaspoon finely chopped thyme
1 clove garlic
1 pound flank steak, pounded to 1/4-inch thick
Olive oil, for brushing
Salt and pepper
Vegetable oil, for searing
Method
Preheat the oven to 350 degrees F. Place the tomato sauce in a 9 by 13-inch baking dish and place in the oven to heat.
In a the bowl of a food processor mix the croutons, cheese, eggs, herbs and garlic until it forms a paste.
Brush the pounded flank steak with the olive oil and season generously with the salt and pepper. Spread the filling evenly over the meat. Roll tightly and tie with butcher's twine.
In a large saute pan heat 1 to 2 tablespoons of vegetable oil and sear all sides of the rolled meat. Remove from the pan.
Add to the hot tomato sauce, cover with a tin foil tent so that the foil is not touching the meat. Braise for 35 minutes or, up to 3 hours.
3 cups tomato sauce
 |
| Braciole |
1/3 cup grated Parmesan
2 eggs
1 tablespoon chopped fresh parsley
1 tablespoon chopped fresh oregano
1 teaspoon finely chopped rosemary
1 teaspoon finely chopped thyme
1 clove garlic
1 pound flank steak, pounded to 1/4-inch thick
Olive oil, for brushing
Salt and pepper
Vegetable oil, for searing
Method
Preheat the oven to 350 degrees F. Place the tomato sauce in a 9 by 13-inch baking dish and place in the oven to heat.
In a the bowl of a food processor mix the croutons, cheese, eggs, herbs and garlic until it forms a paste.
Brush the pounded flank steak with the olive oil and season generously with the salt and pepper. Spread the filling evenly over the meat. Roll tightly and tie with butcher's twine.
In a large saute pan heat 1 to 2 tablespoons of vegetable oil and sear all sides of the rolled meat. Remove from the pan.
Add to the hot tomato sauce, cover with a tin foil tent so that the foil is not touching the meat. Braise for 35 minutes or, up to 3 hours.
Curing Olives
Method 1
Slash or stamp each olive with the side of knife or board to make an opening, and then soak in cold water in earthenware or glass containers for 10 days, changing the water daily. Soak in a brine solution for 24 hours, then wash off the brine and soak for 24 hours in vinegar. Drain. Store in jars in olive oil. This method will preserve olives indefinitely. (If sourer olives are preferred, add a little vinegar to the oil).
Method 2
Choose red to dark red olives; slash them on one side with a very sharp stainless knife to reduce bruising. Place the olives in any non-metallic container. Make a solution of 1/4 cup salt dissolved in 1 quart water, and pour enough over the olives to immerse them. Make sure the olives are completely submerged in the solution. Store in a cool place, changing the solution once a week, for three weeks. Any scum that forms on the surface is harmless; just rinse the container and the olives in fresh water if some forms.
Taste one of the largest at the end of three weeks. If only slightly bitter (should still be a bit tangy), pour off the brine and rinse the olives. If still quite bitter, brine for another week.
Marinade for Olives (use same container)
1 1/2 cups white vinegar
1 tbs salt dissolved in 2 cups water
1/2 tsp dried oregano
3 lemon wedges
2 cloves garlic
Pour marinade over the olives and float enough olive oil to form a layer 1/4 inch on top. The olives will be ready to eat after sitting in the marinade for a few days. Store in a cool place or in fridge. (Warning: if kept too long, the lemon and vinegar flavours will predominate, so eat within a month after ready.)
Water Method
Cover washed olives with a solution of salt water - 1 cup salt to each quart water - in a crock or glass jar. Place a weight, such as a small plate or washed rock, to keep olives submerged. Olives may remain in this brine for months. Marinate in Olive Marinade before serving.
Note: not slashing the olives can result in a strong flavour.
Strongly Salted Olives
Wash and dry the olives. Place in a container in layers, alternating with dry rock or sea salt, using about 300 grams of salt per kilo of olives. Cover and leave for six months. The salt will extract liquid from the olives, leaving them shrivelled. Before eating the olives, rinse in plain water, or soak for a few hours. These olives have a much stronger taste than the first ones.
Lime Method
For each pound of olives you will need:
1 pound wood ash
1 1/2 ounces quick lime (Lime is caustic. Wear rubber gloves at all times while handling it, and, whatever you do, don't get it in your eyes.)
8 teaspoons salt
3 cups water
Make a slurry by mixing the lime, the ashes and the water. Immerse the olives in it, covering them with a weighted top that will keep them immersed in the slurry, and let them soak for twelve to fourteen hours, in other words, until they have become quite soft. Touch them frequently to check their progress. Some people check to see if the pulp of the olive comes free from the pit, but this indicator is sometimes wrong.
Remove the olives from the slurry, rinse them repeatedly, and soak them in fresh water for four or five days, changing the water three times a day, until the water comes clear and the olives lose their bitter taste. Once the olives have reached this stage, set three cups of water to heat on the fire with the salt and several slices of bulb fennel. Boil the water for several minutes, let it cool, pour it over the olives, and store the olives in a glass gar or glazed urn.
Water curing
Generally you water cure the big green ones, right before they turn red. You pick the olives, crack each of them with a rolling pin, then immerse them completely in cold water, changing the water *each* day for at least 25 days. Stir them up when you think about it. Immerse and change the water, etc, taste one after 25 days. If they are too bitter, keep up this regime until they are edible.
Brine Curing
Deeply slit each one using a sharp paring knife, then plunk them into a brine (brine is 1/4 cup canning salt in 1 qt water). Weight down the olives; make sure they are fully immersed. Cover your vat of olives, stir once in awhile, and wait one week. Rinse, and change the olive brine once/week for at least 3 weeks. Taste, if still too bitter, keep changing brine 1/week. Mine usually take about 6 weeks. Scum will form on the top of the vat; it’s harmless *if* olives are immersed, but get rid of it when you see it.
Water-cured Green Olives
Ingredients
5 pounds green mature olives
1-1/2 quarts water
3 tablespoons salt
2 lemons, cut into 1/2-inch cubes
2 tablespoons dried oregano
2 cups white wine vinegar
6 cloves garlic, peeled and halved
2 tablespoons cumin seeds, crushed in a mortar
Olive Oil
Instructions
Crack the flesh of the olives with a rolling pin, or by hitting each one individually with a hammer. Rinse with cold water. Place them in a stoneware, earthenware, glass, or porcelain jar and cover with cold water. Weight them with a piece of wood or a plastic bag filled with water (to keep the olives submerged) and keep them in a dark, cool place for ten days, changing the water every day.
Boil the water and dissolve the salt in it. Empty the liquid from the jar in which the olives have been soaking; rinse the olives in cold water and cover the olives with the salt brine. Mix in the lemons, oregano, vinegar, garlic, and cumin. Float enough olive oil on top to cover the surface. Store in a cool place at least two weeks. To make a more interesting mixture, add a few store-bought Kalamata olives. Store in a cool, dark place. The olives keep quite well for at least two months.
Onoria’s Recipe
In a 5 gallon plastic pail, dissolve 6 ounces of lye in about ½ gallon of warm water. Add about ½ gallon of cold water and stir. Rinse 1 case (18 pounds) of olives in cold water and add to the pail containing the lye solution. Add enough cold water to completely cover the olives. Stir by transferring the olives back and forth several times in 2 plastic pails. To keep the olives submerged, weigh them down with a piece of wood or a plastic bag filled with water and let them sit for 10-12 hours. Drain and rinse the olives several times. Soak in cold water for 4 days. Change the water three (or more) times a day. At the end of 4 days, taste and soaks longer if still bitter. Fill one quart canning jars with the olives, add 1 teaspoon of pickling salt and fill with cold water. Seal and shake to dissolve the salt. Place the jars in boiling water and process for 5 to 6 minutes.
Home-made Soppressata Calabrese (Salami)
 |
| Soppressata |
This recipe comes from Bruno (The Breadman in Sarnia) Lavoratore. Bruno was kind enough to share his recipe with us “Ciociari”, Domenic, Ernie, Onorio and Elio. We gathered in Domenic’s cantina kitchen (the Dungeon as Domenic calls it) to learn the fine art of salami making, grill pork chops and sausages over an open fire and to consume a few liters of homemade wine.
Ingredients
- 10 kg of coarsely lean ground pork – use ham and filet.
- 180 g of curing salt
- 2 glasses of red wine
- 100 g of black peppercorns
- Large hog casing – cut into 50 cm lengths
Method
 1. Place the meat on a plywood board (3’ x 4’) for mixing. Add the curing salt, peppercorns and wine.
 2. Using both hands mix the ingredients thoroughly. Grab handfuls of meat and squeeze till the meat oozes out between your fingers. Continue working the meat until it becomes very sticky (approximately 20 minutes).
3. Slide the casing over the funnel of the sausage-stuffing machine. Tie one end of the casing with butcher string. Stuff the meat mixture into the casing. Tie into 8-10 inch lengths. Poke holes in the casing with a large needle to let the air out.
4. Using butcher string tie the salami tightly, approximately 25 mm apart.
5. Dip the ends of the salami in salt.

7. Layer the salami in the box on top of the towels. Continue layering until they are all tightly packed in the box.
8. Place a board to completely cover the top layer and add a 20 kg weight (20 liter plastic pail full of water).
9. Keep in a cool cellar for 2 days.
10. Remove from the crate and hang for 2 days. Ensure that they do not touch each other.
11. Repack the salami in the crate and double the weight. Make sure that the salami is placed back into the crate in the same direction to keep the flat shape. Let sit for 24 hours.
12. Hang in a cool, moist cellar for 3-4 months for curing.
Home-made Ricotta
Ricotta is easy to make and the taste so special that you will want to make it weekly to have on hand for eating and cooking. You will need to have a cooking thermometer to ensure success.
Yield: 4 cups (about 2 pounds)
Preparation Time:
5 minutes, plus 2 hours resting and 2 hours draining
Cooking Time: 20-30 minutes
Ingredients
• 1 gallon whole pasteurized milk
• 1/2 teaspoon salt
• 1/3 cup plus 1 tablespoon distilled white vinegar
Method
1. Use a large, heavy-gauge stainless-steel saucepot. Wash it thoroughly with very hot water, but do not bother to dry it. (Leaving it wet helps prevent the milk from scorching.) Place the milk in the saucepot over medium heat. Add the salt and stir briefly. Allow the milk to heat up slowly, stirring occasionally with a metal spatula. When you notice tiny bubbles and steam forming on the surface of the milk, stir more frequently; don't let it scorch. You want it to reach 190 degrees F, near scalding temperature, just before boiling. Check the temperature with your thermometer periodically.
2. When it reaches the correct temperature, turn the heat off, add the vinegar, and stir gently for 1 minute. You will notice curds forming immediately. Take the pot off the stove. Cover with a dry, clean dishtowel and allow the mixture to sit undisturbed for 2 hours. On cold days, you can prepare your ricotta in the morning before going to work and let it sit until you come home.
3. When the ricotta has rested for 2 or more hours, take a piece of cheesecloth, dampen it with water, and lay it out inside a colander. With a slotted spoon or sieve, ladle out the ricotta into the prepared colander. Place the colander with the ricotta inside a larger pan or bowl so it can drain freely. Let it drain for 2 hours or longer.
4. Store the cheese in a covered container in the refrigerator.
Snowbirds Cell Phone Plans
Canadian Snowbirds vacationing in Florida for the winter months need a cheap reliable telephone to communicate with their family back home. Most Canadian cell phone plans do not work in the United States and the ones that do are very expensive.
Prepaid Cell Phone Plans
Prepaid cell phones, also known as "prepay-as-you-go" phones offer a way around this problem, so let’s take a look at the advantages that they can bring with them.
The first thing in favor of prepaid cellular phones is the simplicity, you just buy the cell phone and don’t have to sign anything or even give any contact details.
• No contracts to sign
• No credit checks
• No monthly bills
• No service fees
• No cancellation fees
• No security deposits
• So some cell phone carriers appreciate this and provide different cellular phone plans.
Prepaid cell phones are very convenient and the best choice for Snowbirds traveling in the States. Another advantage to the "prepay" option is that it acts as a natural brake on excessive use of your wireless cell phone. For this reason, people on a fixed budget prefer prepaid cell phones.
On the downside, the price per minute rate is steeper than for a monthly billed plan. But, if you don’t use the phone a lot and you are only interested in the basics, the prepaid is your best choice.
There are so many cellular phones to choose from such as Panasonic, Motorola, Nokia, Philips and Sony Ericsson; Kyocera, LG, Sanyo, Siemens and NEC; Handspring, Palm, Audiovox, Qualcomm and Samsung; Denso, Hyundai, JRC, Mitsubishi, Neopoint, Novatel, Oki, and Bosch.
A 'pay as you go' plan you buy a cell phone made to use with this type of plan. You can purchase the phones from stores like Target, Wal-Mart, Seven Eleven and elsewhere. The phone needs to be made for the carrier you will be using. If you don't have a credit card or don't want to use it, you can purchase a phone card for that carrier. They cost anywhere from $20 up, and are just plastic cards used to add credit to your account.
To activate your phone just call the carrier's number listed in the phone manual. The representative will ask for the serial number of your phone and assign a phone number. Some carriers automatically credit your account with $10 for signing up with them, but if not, you can add credits to your account with the phone card you purchased. Your account is recorded using the cell number, so you don't even have to give the company your name! The phone can also be activated on line.
The cheapest prepaid cell plan is available at Wal-Mart. You can purchase a Tracfone made by Motorola for $12.88 and 60 minute card for $19.88. This gives 60 minutes of air time for less than $35.00 that is good for 90 days. Usually, this is sufficient for the average Snowbird to last his entire vacation and if more is needed, you simply buy another card.
Standard Plans
Though standard plans differ, most involve a mandatory long-term contract of 1-3 years. A credit card and a minimum monthly fee of about $20 - $35 U.S are required. This gives you approximately 200 - 300 minutes of air time. You can buy more minutes for a higher monthly fee. If you go over your allotment you will likely be charged a premium rate for each additional minute. Unfortunately if you don't use all your minutes, they normally do not roll over. That is, you lose them and start over the following month.
Standard cell phone plans have other advantages over 'pay as you go' plans. They often include:
• Free weekends and evening calling
• Free calling to any other cell phone that uses the same service
• Free calling to certain cell numbers on other services.
• Free calling to friends or family members.
Carriers have their own combination of features to choose from. In fact these plans can present so many options that some people can find it confusing.
Finally, standard cell phone plans usually offer a high quality free phone with the plan or more expensive phones at deep discounts. This plan is probably the way to go for anyone who uses a cell phone more than 90 minutes every month. Unfortunately a standard phone plan is not an option for a Snowbird who does not resides in the States full time.
Bocce

Bocce is a bowling game in which teams lob or roll the bocce (balls) toward a smaller target ball, called the pallino. The object is to get a ball closer to the pallino than the opponent's ball. Teams are needed to play Bocce. The teams can be made up of one, two, three, four or more persons per team. One point is awarded to a given team for every ball that is closer to the pallino than the closest ball of the opposing team. The team which wins a frame on points, starts play in the next frame. A game consists of 12 points.
History
Throwing balls toward a target is the oldest game known to mankind. As early as 5000 B.C. the Egyptians played a form of bocce with polished rocks. Graphic representations of figures tossing a ball or polished stone have been recorded as early as 5200 B.C. While bocce today looks quite different from its early predecessors, the objective of trying to come as close to a fixed target as possible has not changed. From this early objective, the basic rules of bocce were born. From Egypt the game made its way to Greece around 800 B.C. The Romans learned the game from the Greeks, then introduced it throughout the empire.
In modern times, the first bocce clubs were organized in Italy. Notably the first Italian League was formed in 1947 by fifteen teams in and around the town of Rivoli (Torino). 1947 also marks the beginning of the yearly Bocce World Championships.
Thanks to many Italian immigrants, bocce has come to flourish in the United States and Canada. During its beginnings in North America there were as many versions of the game as there were towns the immigrants had left. Bringing some order to the game is the Collegium Cosmicum ad Buxeas, the bocce organization headquartered in Rome, Italy.
The Italian Tradition
Italy has produced the main game. It began and remains predominantly an open-air activity, played on long, rectangular courts improvised from rough village spaces during the hot, dry summers. The surface consists of raked sand or gravel. The game is still often played informally in the village and cafe tradition by men of all ages, but it has now acquired a national and international competitive form and, in many cases, dedicated indoor facilities (like the one at the Dante Club Bocciofila in Sarnia, Ontario) makes it possible for year-round play.
Although it now has the superstructures of a modern sport, bocce is still largely local and recreational in its appeal. Given its peasant origins, it is hardly surprising that it remains male-dominated, although a number of mixed leagues have sprung up. Despite its growing complexity, its appeal lies in its being a "sport simpatico e popolare" in the words of a recent enthusiast --something essentially part of an Italian summer.
Bocce Links
Bocce Standards Association
Joy of Bocce
Bocce Volo
Jajah
What is JAJAH
Jajah is a VoIP (Voice over IP) provider. Jajah's primary service takes an approach called web-activated telephony, using VoIP to connect traditional phones (landline or mobile). Calls are made without download or user-installed software. Rates are lower than traditional phone companies or even free of charge when both call participants are registered as JAJAH.
Jajah Web
Jajah Web connects existing traditional landline or mobile phones with calls that are set up via Jajah's Web site.
To place a call:
• Go to Jajah web site at http://www.jajah.com/
• Log in using your user ID and password (registration is free)
• Enter your phone number
• Enter the desired destination number
• The Jajah service first rings your phone
• After the caller picks up the phone, the destination telephone rings and the connection is established.
Jajah works with any standard web browser. It does not require a broadband connection, nor is it necessary to be online when using the service, but it is necessary to have internet access to originate the call.
Dial-up internet users without a second phone line must schedule their call to be placed a few minutes in the future in order to allow for the time required to disconnect from their ISP and free up the phone line.
Jajah Free Global Calling
Jajah's service is limited to specified geographic areas, and Jajah has also adopted a Fair Use Policy which limit the amount of free Jajah calls.
Calls between registered Jajah users are free of charge for landline and mobile calls within the USA, Canada, China, Singapore, Hong Kong, Thailand and apply also for landline calls to and within most European countries as well as Argentina, Australia, Israel, Japan, Malaysia, Mexico City, New Zealand, Venezuela and Zambia.
A further limitation is that scheduled calls and conference calls cannot be free. In addition, calls are only free if money is paid into a user's Jajah account.
Technology
The process of establishing calls between two regular landline or mobile phones via VoIP is shown below.

Magic Jack
 What is MagicJack
The MagicJack is a device the size of a matchbox that acts as a phone jack for the PC and lets consumers or small businesses plug in their existing phones to make free local and long-distance calls. MagicJack turns a PC into a communications hub. MagicJack has a USB end that plugs into your computer and a phone jack on the other end that plugs in a telephone. In other words, your phone service provider runs your calls through the Internet, through your computer, to your normal telephone.
Together with the MagicJack software, it offers various features including call waiting, 911 service, conference calling, and voice mail.
With MagicJack, you can experience calling freedom with unlimited local and long distance calls to anyone in the U.S., Canada, and parts of Europe (landline or cell phones). Plus, you can call any MagicJack enabled phone for free, allowing family or friends outside of North America with a MagicJack to be able to call you for free. All that is required is the MagicJack unit, and an internet connection. It also accepts incoming calls! By giving out your personal MagicJack phone number, your friends and family can all you anytime your MagicJack is turned on. The MagicJack is perfect for travelers or students in college or university.
Requirements
• Any computer with Windows XP, Vista or Mac/Apple operating system
• One of the following: broadband, high-speed internet, cable internet, DSL, WiFi or WiMax
• Your present corded or cordless telephone
The first time you plug in your MagicJack, it will install within minutes. The next time you plug it in, you can use it in seconds!
Where To Purchase
In the US it can be purchased at http://www.magicjack.com/site/index.html
In Canada it can be purchased at http://www.themagicjack.ca/
The MagicJack costs $39.95, which includes a year's subscription to YMax's phone service. Customers won't be charged an additional monthly fees and subsequent years costs $19.95
This and That Defined
We created an Internet resource to share our experience and knowledge with you. We have been collecting and writing articles for a long time, our collection has become so large that we decided that the time was right to share it with you over the Internet. By sharing our knowledge, experience and expertise, we hope that you are impressed enough and return to our site to learn more.
Subscribe to:
Posts (Atom)
Profile

- Camlachie, Ontario, Canada
- I created this blog to share my experience and knowledge with you. I have been collecting information for a long time, my collection has become so large that I decided to share it with you. I hope that you find this site informative enough to visit it again.