This recipe simplifies the process of making risotto. The classic risotto recipe has been modified to eliminate constant stirring.
Ingredients
(Serves 4)
1 cup of Aborio rice
1 small onion finely chpped
1 clove of garlic finely chopped
2 1/2 cups of chicken broth
2 tablespoons of extra virgin olive oil
2 tablespoons of butter
2 tablespoons of grated Parmeggiano Reggiano cheese
Salt and pepper to taste
Method
1. In a sauce pan, heat the olive oil
2. Add the onion and the garlic. Do not brown, just soften.
3. Add the rice and stir for 1 minute to coat the rice with the oil..
4. Add the chicken stock and bring to a boil.
5. Cover and lower the heat to the lowest setting. Simmer for 20 minutes.
6. Add salt and pepper to taste.
7. Stir in the butter and the cheese.
8. Serve with a nice salad and a glass of your favourite wine. Enjoy.

Your information source!
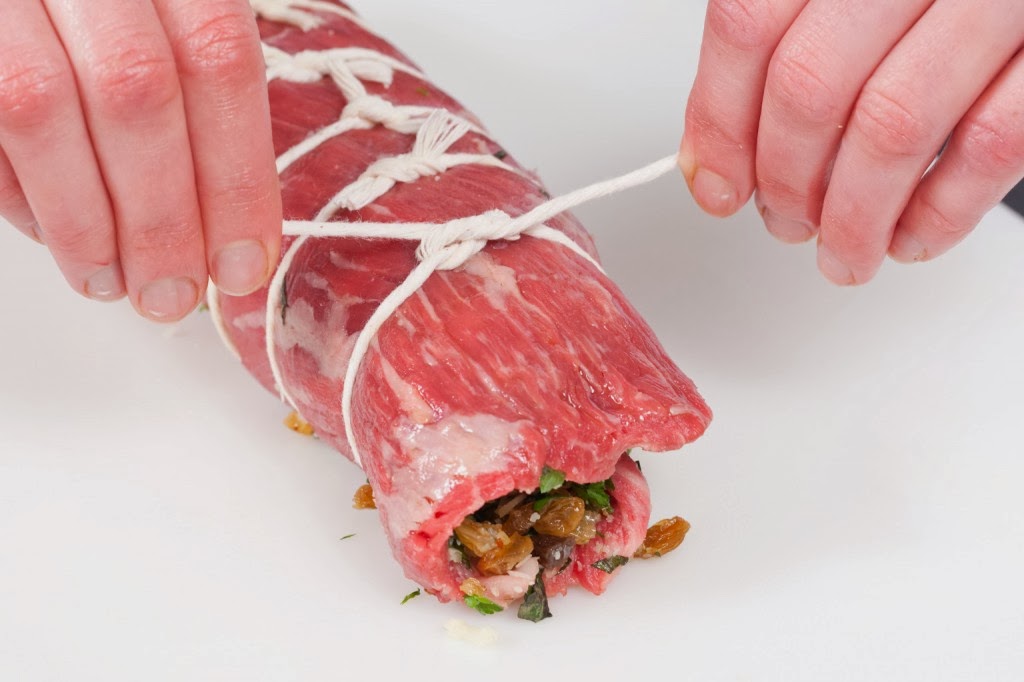
Braciole – Rolled Flank Steak
Incredients
3 cups tomato sauce
1 1/4 cups flavored croutons
1/3 cup grated Parmesan
2 eggs
1 tablespoon chopped fresh parsley
1 tablespoon chopped fresh oregano
1 teaspoon finely chopped rosemary
1 teaspoon finely chopped thyme
1 clove garlic
1 pound flank steak, pounded to 1/4-inch thick
Olive oil, for brushing
Salt and pepper
Vegetable oil, for searing
Method
Preheat the oven to 350 degrees F. Place the tomato sauce in a 9 by 13-inch baking dish and place in the oven to heat.
In a the bowl of a food processor mix the croutons, cheese, eggs, herbs and garlic until it forms a paste.
Brush the pounded flank steak with the olive oil and season generously with the salt and pepper. Spread the filling evenly over the meat. Roll tightly and tie with butcher's twine.
In a large saute pan heat 1 to 2 tablespoons of vegetable oil and sear all sides of the rolled meat. Remove from the pan.
Add to the hot tomato sauce, cover with a tin foil tent so that the foil is not touching the meat. Braise for 35 minutes or, up to 3 hours.
3 cups tomato sauce
 |
| Braciole |
1/3 cup grated Parmesan
2 eggs
1 tablespoon chopped fresh parsley
1 tablespoon chopped fresh oregano
1 teaspoon finely chopped rosemary
1 teaspoon finely chopped thyme
1 clove garlic
1 pound flank steak, pounded to 1/4-inch thick
Olive oil, for brushing
Salt and pepper
Vegetable oil, for searing
Method
Preheat the oven to 350 degrees F. Place the tomato sauce in a 9 by 13-inch baking dish and place in the oven to heat.
In a the bowl of a food processor mix the croutons, cheese, eggs, herbs and garlic until it forms a paste.
Brush the pounded flank steak with the olive oil and season generously with the salt and pepper. Spread the filling evenly over the meat. Roll tightly and tie with butcher's twine.
In a large saute pan heat 1 to 2 tablespoons of vegetable oil and sear all sides of the rolled meat. Remove from the pan.
Add to the hot tomato sauce, cover with a tin foil tent so that the foil is not touching the meat. Braise for 35 minutes or, up to 3 hours.
Curing Olives
Method 1
Slash or stamp each olive with the side of knife or board to make an opening, and then soak in cold water in earthenware or glass containers for 10 days, changing the water daily. Soak in a brine solution for 24 hours, then wash off the brine and soak for 24 hours in vinegar. Drain. Store in jars in olive oil. This method will preserve olives indefinitely. (If sourer olives are preferred, add a little vinegar to the oil).
Method 2
Choose red to dark red olives; slash them on one side with a very sharp stainless knife to reduce bruising. Place the olives in any non-metallic container. Make a solution of 1/4 cup salt dissolved in 1 quart water, and pour enough over the olives to immerse them. Make sure the olives are completely submerged in the solution. Store in a cool place, changing the solution once a week, for three weeks. Any scum that forms on the surface is harmless; just rinse the container and the olives in fresh water if some forms.
Taste one of the largest at the end of three weeks. If only slightly bitter (should still be a bit tangy), pour off the brine and rinse the olives. If still quite bitter, brine for another week.
Marinade for Olives (use same container)
1 1/2 cups white vinegar
1 tbs salt dissolved in 2 cups water
1/2 tsp dried oregano
3 lemon wedges
2 cloves garlic
Pour marinade over the olives and float enough olive oil to form a layer 1/4 inch on top. The olives will be ready to eat after sitting in the marinade for a few days. Store in a cool place or in fridge. (Warning: if kept too long, the lemon and vinegar flavours will predominate, so eat within a month after ready.)
Water Method
Cover washed olives with a solution of salt water - 1 cup salt to each quart water - in a crock or glass jar. Place a weight, such as a small plate or washed rock, to keep olives submerged. Olives may remain in this brine for months. Marinate in Olive Marinade before serving.
Note: not slashing the olives can result in a strong flavour.
Strongly Salted Olives
Wash and dry the olives. Place in a container in layers, alternating with dry rock or sea salt, using about 300 grams of salt per kilo of olives. Cover and leave for six months. The salt will extract liquid from the olives, leaving them shrivelled. Before eating the olives, rinse in plain water, or soak for a few hours. These olives have a much stronger taste than the first ones.
Lime Method
For each pound of olives you will need:
1 pound wood ash
1 1/2 ounces quick lime (Lime is caustic. Wear rubber gloves at all times while handling it, and, whatever you do, don't get it in your eyes.)
8 teaspoons salt
3 cups water
Make a slurry by mixing the lime, the ashes and the water. Immerse the olives in it, covering them with a weighted top that will keep them immersed in the slurry, and let them soak for twelve to fourteen hours, in other words, until they have become quite soft. Touch them frequently to check their progress. Some people check to see if the pulp of the olive comes free from the pit, but this indicator is sometimes wrong.
Remove the olives from the slurry, rinse them repeatedly, and soak them in fresh water for four or five days, changing the water three times a day, until the water comes clear and the olives lose their bitter taste. Once the olives have reached this stage, set three cups of water to heat on the fire with the salt and several slices of bulb fennel. Boil the water for several minutes, let it cool, pour it over the olives, and store the olives in a glass gar or glazed urn.
Water curing
Generally you water cure the big green ones, right before they turn red. You pick the olives, crack each of them with a rolling pin, then immerse them completely in cold water, changing the water *each* day for at least 25 days. Stir them up when you think about it. Immerse and change the water, etc, taste one after 25 days. If they are too bitter, keep up this regime until they are edible.
Brine Curing
Deeply slit each one using a sharp paring knife, then plunk them into a brine (brine is 1/4 cup canning salt in 1 qt water). Weight down the olives; make sure they are fully immersed. Cover your vat of olives, stir once in awhile, and wait one week. Rinse, and change the olive brine once/week for at least 3 weeks. Taste, if still too bitter, keep changing brine 1/week. Mine usually take about 6 weeks. Scum will form on the top of the vat; it’s harmless *if* olives are immersed, but get rid of it when you see it.
Water-cured Green Olives
Ingredients
5 pounds green mature olives
1-1/2 quarts water
3 tablespoons salt
2 lemons, cut into 1/2-inch cubes
2 tablespoons dried oregano
2 cups white wine vinegar
6 cloves garlic, peeled and halved
2 tablespoons cumin seeds, crushed in a mortar
Olive Oil
Instructions
Crack the flesh of the olives with a rolling pin, or by hitting each one individually with a hammer. Rinse with cold water. Place them in a stoneware, earthenware, glass, or porcelain jar and cover with cold water. Weight them with a piece of wood or a plastic bag filled with water (to keep the olives submerged) and keep them in a dark, cool place for ten days, changing the water every day.
Boil the water and dissolve the salt in it. Empty the liquid from the jar in which the olives have been soaking; rinse the olives in cold water and cover the olives with the salt brine. Mix in the lemons, oregano, vinegar, garlic, and cumin. Float enough olive oil on top to cover the surface. Store in a cool place at least two weeks. To make a more interesting mixture, add a few store-bought Kalamata olives. Store in a cool, dark place. The olives keep quite well for at least two months.
Onoria’s Recipe
In a 5 gallon plastic pail, dissolve 6 ounces of lye in about ½ gallon of warm water. Add about ½ gallon of cold water and stir. Rinse 1 case (18 pounds) of olives in cold water and add to the pail containing the lye solution. Add enough cold water to completely cover the olives. Stir by transferring the olives back and forth several times in 2 plastic pails. To keep the olives submerged, weigh them down with a piece of wood or a plastic bag filled with water and let them sit for 10-12 hours. Drain and rinse the olives several times. Soak in cold water for 4 days. Change the water three (or more) times a day. At the end of 4 days, taste and soaks longer if still bitter. Fill one quart canning jars with the olives, add 1 teaspoon of pickling salt and fill with cold water. Seal and shake to dissolve the salt. Place the jars in boiling water and process for 5 to 6 minutes.
Home-made Soppressata Calabrese (Salami)
 |
| Soppressata |
This recipe comes from Bruno (The Breadman in Sarnia) Lavoratore. Bruno was kind enough to share his recipe with us “Ciociari”, Domenic, Ernie, Onorio and Elio. We gathered in Domenic’s cantina kitchen (the Dungeon as Domenic calls it) to learn the fine art of salami making, grill pork chops and sausages over an open fire and to consume a few liters of homemade wine.
Ingredients
- 10 kg of coarsely lean ground pork – use ham and filet.
- 180 g of curing salt
- 2 glasses of red wine
- 100 g of black peppercorns
- Large hog casing – cut into 50 cm lengths
Method
 1. Place the meat on a plywood board (3’ x 4’) for mixing. Add the curing salt, peppercorns and wine.
 2. Using both hands mix the ingredients thoroughly. Grab handfuls of meat and squeeze till the meat oozes out between your fingers. Continue working the meat until it becomes very sticky (approximately 20 minutes).
3. Slide the casing over the funnel of the sausage-stuffing machine. Tie one end of the casing with butcher string. Stuff the meat mixture into the casing. Tie into 8-10 inch lengths. Poke holes in the casing with a large needle to let the air out.
4. Using butcher string tie the salami tightly, approximately 25 mm apart.
5. Dip the ends of the salami in salt.

7. Layer the salami in the box on top of the towels. Continue layering until they are all tightly packed in the box.
8. Place a board to completely cover the top layer and add a 20 kg weight (20 liter plastic pail full of water).
9. Keep in a cool cellar for 2 days.
10. Remove from the crate and hang for 2 days. Ensure that they do not touch each other.
11. Repack the salami in the crate and double the weight. Make sure that the salami is placed back into the crate in the same direction to keep the flat shape. Let sit for 24 hours.
12. Hang in a cool, moist cellar for 3-4 months for curing.
Home-made Ricotta
Ricotta is easy to make and the taste so special that you will want to make it weekly to have on hand for eating and cooking. You will need to have a cooking thermometer to ensure success.
Yield: 4 cups (about 2 pounds)
Preparation Time:
5 minutes, plus 2 hours resting and 2 hours draining
Cooking Time: 20-30 minutes
Ingredients
• 1 gallon whole pasteurized milk
• 1/2 teaspoon salt
• 1/3 cup plus 1 tablespoon distilled white vinegar
Method
1. Use a large, heavy-gauge stainless-steel saucepot. Wash it thoroughly with very hot water, but do not bother to dry it. (Leaving it wet helps prevent the milk from scorching.) Place the milk in the saucepot over medium heat. Add the salt and stir briefly. Allow the milk to heat up slowly, stirring occasionally with a metal spatula. When you notice tiny bubbles and steam forming on the surface of the milk, stir more frequently; don't let it scorch. You want it to reach 190 degrees F, near scalding temperature, just before boiling. Check the temperature with your thermometer periodically.
2. When it reaches the correct temperature, turn the heat off, add the vinegar, and stir gently for 1 minute. You will notice curds forming immediately. Take the pot off the stove. Cover with a dry, clean dishtowel and allow the mixture to sit undisturbed for 2 hours. On cold days, you can prepare your ricotta in the morning before going to work and let it sit until you come home.
3. When the ricotta has rested for 2 or more hours, take a piece of cheesecloth, dampen it with water, and lay it out inside a colander. With a slotted spoon or sieve, ladle out the ricotta into the prepared colander. Place the colander with the ricotta inside a larger pan or bowl so it can drain freely. Let it drain for 2 hours or longer.
4. Store the cheese in a covered container in the refrigerator.
Snowbirds Cell Phone Plans
Canadian Snowbirds vacationing in Florida for the winter months need a cheap reliable telephone to communicate with their family back home. Most Canadian cell phone plans do not work in the United States and the ones that do are very expensive.
Prepaid Cell Phone Plans
Prepaid cell phones, also known as "prepay-as-you-go" phones offer a way around this problem, so let’s take a look at the advantages that they can bring with them.
The first thing in favor of prepaid cellular phones is the simplicity, you just buy the cell phone and don’t have to sign anything or even give any contact details.
• No contracts to sign
• No credit checks
• No monthly bills
• No service fees
• No cancellation fees
• No security deposits
• So some cell phone carriers appreciate this and provide different cellular phone plans.
Prepaid cell phones are very convenient and the best choice for Snowbirds traveling in the States. Another advantage to the "prepay" option is that it acts as a natural brake on excessive use of your wireless cell phone. For this reason, people on a fixed budget prefer prepaid cell phones.
On the downside, the price per minute rate is steeper than for a monthly billed plan. But, if you don’t use the phone a lot and you are only interested in the basics, the prepaid is your best choice.
There are so many cellular phones to choose from such as Panasonic, Motorola, Nokia, Philips and Sony Ericsson; Kyocera, LG, Sanyo, Siemens and NEC; Handspring, Palm, Audiovox, Qualcomm and Samsung; Denso, Hyundai, JRC, Mitsubishi, Neopoint, Novatel, Oki, and Bosch.
A 'pay as you go' plan you buy a cell phone made to use with this type of plan. You can purchase the phones from stores like Target, Wal-Mart, Seven Eleven and elsewhere. The phone needs to be made for the carrier you will be using. If you don't have a credit card or don't want to use it, you can purchase a phone card for that carrier. They cost anywhere from $20 up, and are just plastic cards used to add credit to your account.
To activate your phone just call the carrier's number listed in the phone manual. The representative will ask for the serial number of your phone and assign a phone number. Some carriers automatically credit your account with $10 for signing up with them, but if not, you can add credits to your account with the phone card you purchased. Your account is recorded using the cell number, so you don't even have to give the company your name! The phone can also be activated on line.
The cheapest prepaid cell plan is available at Wal-Mart. You can purchase a Tracfone made by Motorola for $12.88 and 60 minute card for $19.88. This gives 60 minutes of air time for less than $35.00 that is good for 90 days. Usually, this is sufficient for the average Snowbird to last his entire vacation and if more is needed, you simply buy another card.
Standard Plans
Though standard plans differ, most involve a mandatory long-term contract of 1-3 years. A credit card and a minimum monthly fee of about $20 - $35 U.S are required. This gives you approximately 200 - 300 minutes of air time. You can buy more minutes for a higher monthly fee. If you go over your allotment you will likely be charged a premium rate for each additional minute. Unfortunately if you don't use all your minutes, they normally do not roll over. That is, you lose them and start over the following month.
Standard cell phone plans have other advantages over 'pay as you go' plans. They often include:
• Free weekends and evening calling
• Free calling to any other cell phone that uses the same service
• Free calling to certain cell numbers on other services.
• Free calling to friends or family members.
Carriers have their own combination of features to choose from. In fact these plans can present so many options that some people can find it confusing.
Finally, standard cell phone plans usually offer a high quality free phone with the plan or more expensive phones at deep discounts. This plan is probably the way to go for anyone who uses a cell phone more than 90 minutes every month. Unfortunately a standard phone plan is not an option for a Snowbird who does not resides in the States full time.
Bocce

Bocce is a bowling game in which teams lob or roll the bocce (balls) toward a smaller target ball, called the pallino. The object is to get a ball closer to the pallino than the opponent's ball. Teams are needed to play Bocce. The teams can be made up of one, two, three, four or more persons per team. One point is awarded to a given team for every ball that is closer to the pallino than the closest ball of the opposing team. The team which wins a frame on points, starts play in the next frame. A game consists of 12 points.
History
Throwing balls toward a target is the oldest game known to mankind. As early as 5000 B.C. the Egyptians played a form of bocce with polished rocks. Graphic representations of figures tossing a ball or polished stone have been recorded as early as 5200 B.C. While bocce today looks quite different from its early predecessors, the objective of trying to come as close to a fixed target as possible has not changed. From this early objective, the basic rules of bocce were born. From Egypt the game made its way to Greece around 800 B.C. The Romans learned the game from the Greeks, then introduced it throughout the empire.
In modern times, the first bocce clubs were organized in Italy. Notably the first Italian League was formed in 1947 by fifteen teams in and around the town of Rivoli (Torino). 1947 also marks the beginning of the yearly Bocce World Championships.
Thanks to many Italian immigrants, bocce has come to flourish in the United States and Canada. During its beginnings in North America there were as many versions of the game as there were towns the immigrants had left. Bringing some order to the game is the Collegium Cosmicum ad Buxeas, the bocce organization headquartered in Rome, Italy.
The Italian Tradition
Italy has produced the main game. It began and remains predominantly an open-air activity, played on long, rectangular courts improvised from rough village spaces during the hot, dry summers. The surface consists of raked sand or gravel. The game is still often played informally in the village and cafe tradition by men of all ages, but it has now acquired a national and international competitive form and, in many cases, dedicated indoor facilities (like the one at the Dante Club Bocciofila in Sarnia, Ontario) makes it possible for year-round play.
Although it now has the superstructures of a modern sport, bocce is still largely local and recreational in its appeal. Given its peasant origins, it is hardly surprising that it remains male-dominated, although a number of mixed leagues have sprung up. Despite its growing complexity, its appeal lies in its being a "sport simpatico e popolare" in the words of a recent enthusiast --something essentially part of an Italian summer.
Bocce Links
Bocce Standards Association
Joy of Bocce
Bocce Volo
Subscribe to:
Posts (Atom)
Profile

- Camlachie, Ontario, Canada
- I created this blog to share my experience and knowledge with you. I have been collecting information for a long time, my collection has become so large that I decided to share it with you. I hope that you find this site informative enough to visit it again.